Use a GoPro Blank Template & Make it Original
AKA: Create the Edits You Want in GoPro Studio
As I indicated in my introduction to GoPro Studio, it’s a straightforward and free video editing application, and you don’t need a GoPro camera to use it. The software can be downloaded here. A list of compatible file formats can be found here.
For Narcissisticam I I used an existing GoPro Studio Template. For that project all edits were in place and synched to the provided audio track. I simply removed GoPro’s clips and replaced them with my own. For Narcissisticam II I decided to dig deeper and create my own original edits to a song of my choice. To accomplish this I used a GoPro Blank Template.
For those who haven’t seen my intro (Narcissticam I), the software interface is broken down into three simple tabbed steps: View & Trim; Edit; Export.
- View & Trim – Import and view your source files and set rough trim points (if wanted) before converting them to CineForm files for editing.
- Edit – This is where the main work gets done. You’ll do all of your editing here. Combine multiple videos, add effects, music and titles. This is also where you can select a GoPro Template or create your own edits using a Go Pro Blank Template.
- Export – Share your movie with the world by choosing a variety of export formats (or by creating your own custom setting).
The Three-Tabbed GoPro Blank Template Interface in Detail
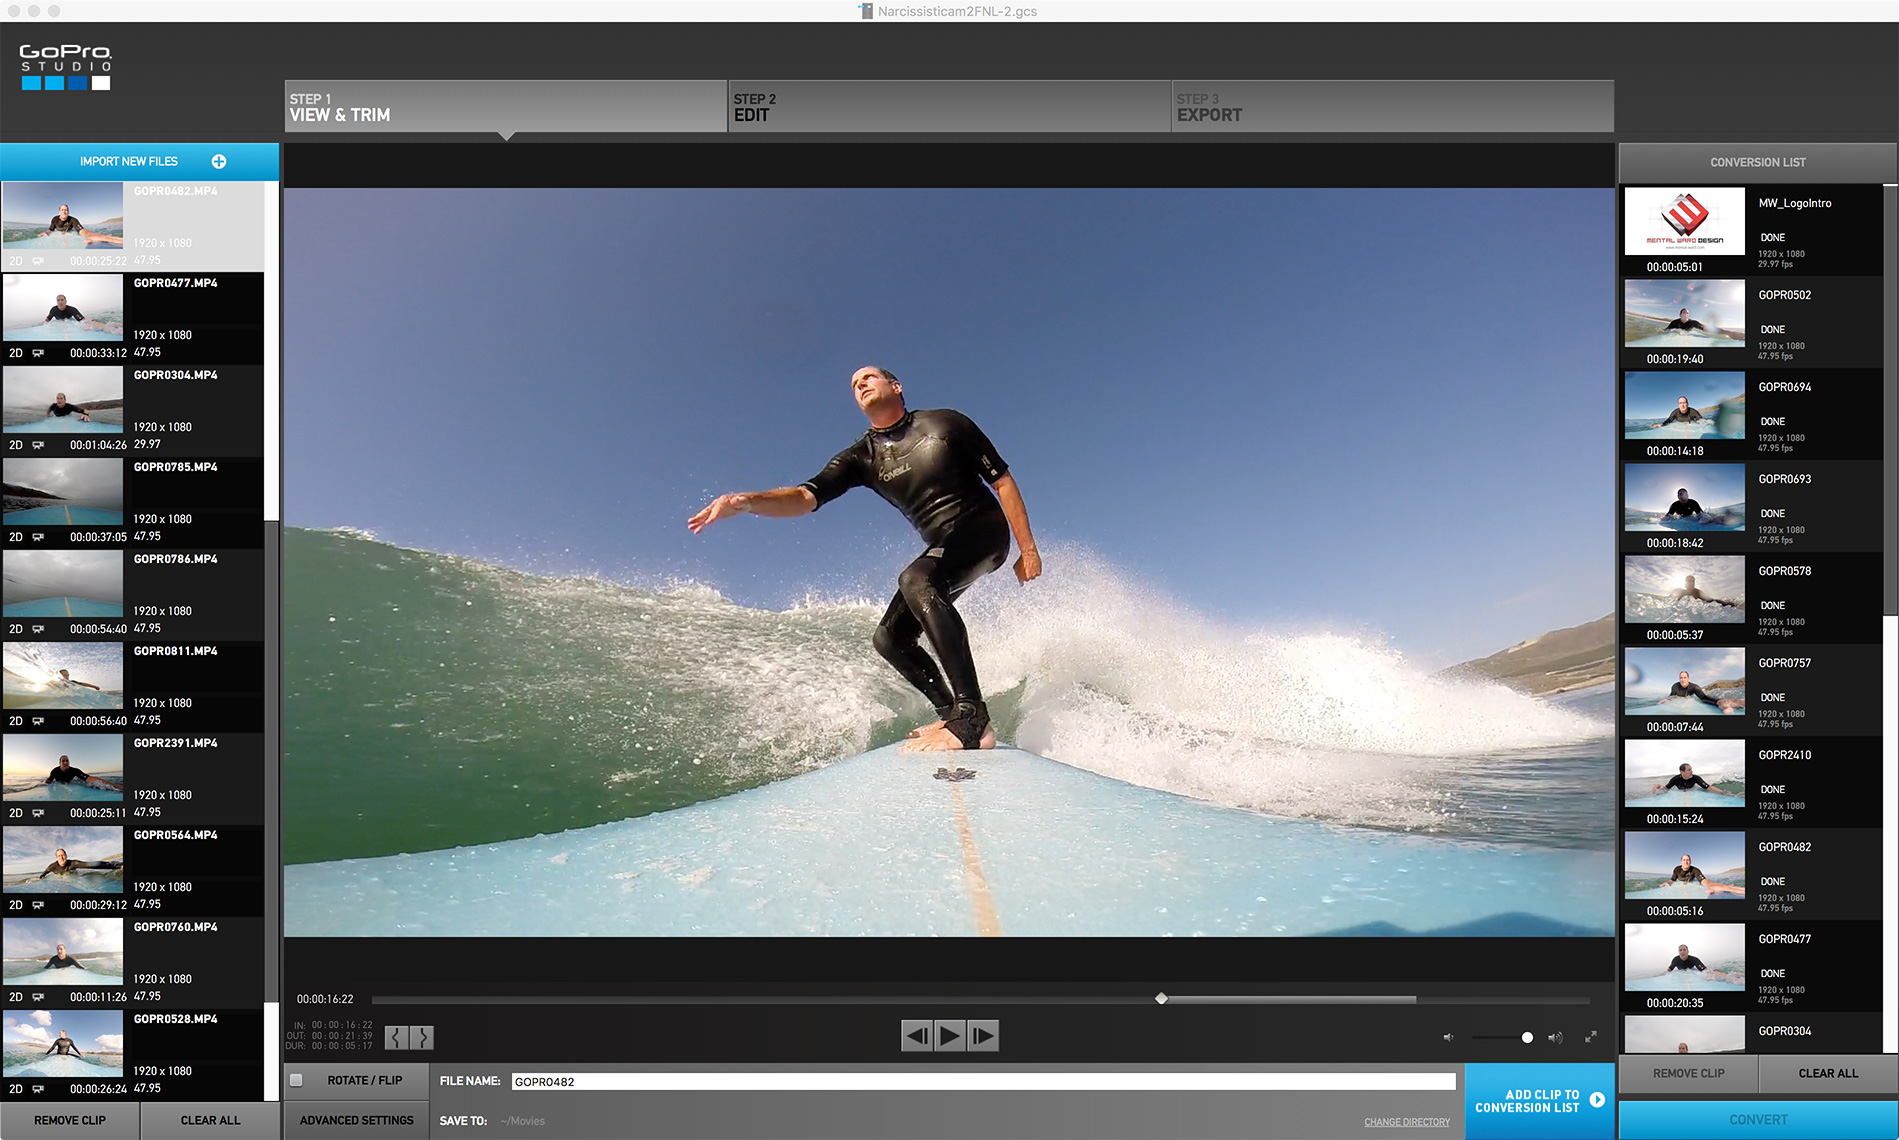
Step 1: VIEW & TRIM
In the first step you import your source files. Individual clips can be viewed in the center window. Use the trim buttons (brackets below and to the left of the playback slider) to set initial trim points and keep overall file size down*. Referencing the above image, the gray area in the slider indicates where this clip (the one highlighted in the list at left) has been trimmed prior to conversion. The advanced settings button is where you can set the size, frame rate and quality for each clip. You can also choose to remove fisheye and speed up the clip from 2x – 1000x.
After trimming (and using advanced settings if you choose) clips are added to the conversion list at right, where they can be converted into GoPro CineForm files. After conversion you’re ready to edit your movie and move on to step 2.
* These initial trim points affect only the converted CineForm file and can be edited at any time.
Click on image to see larger detailed version.
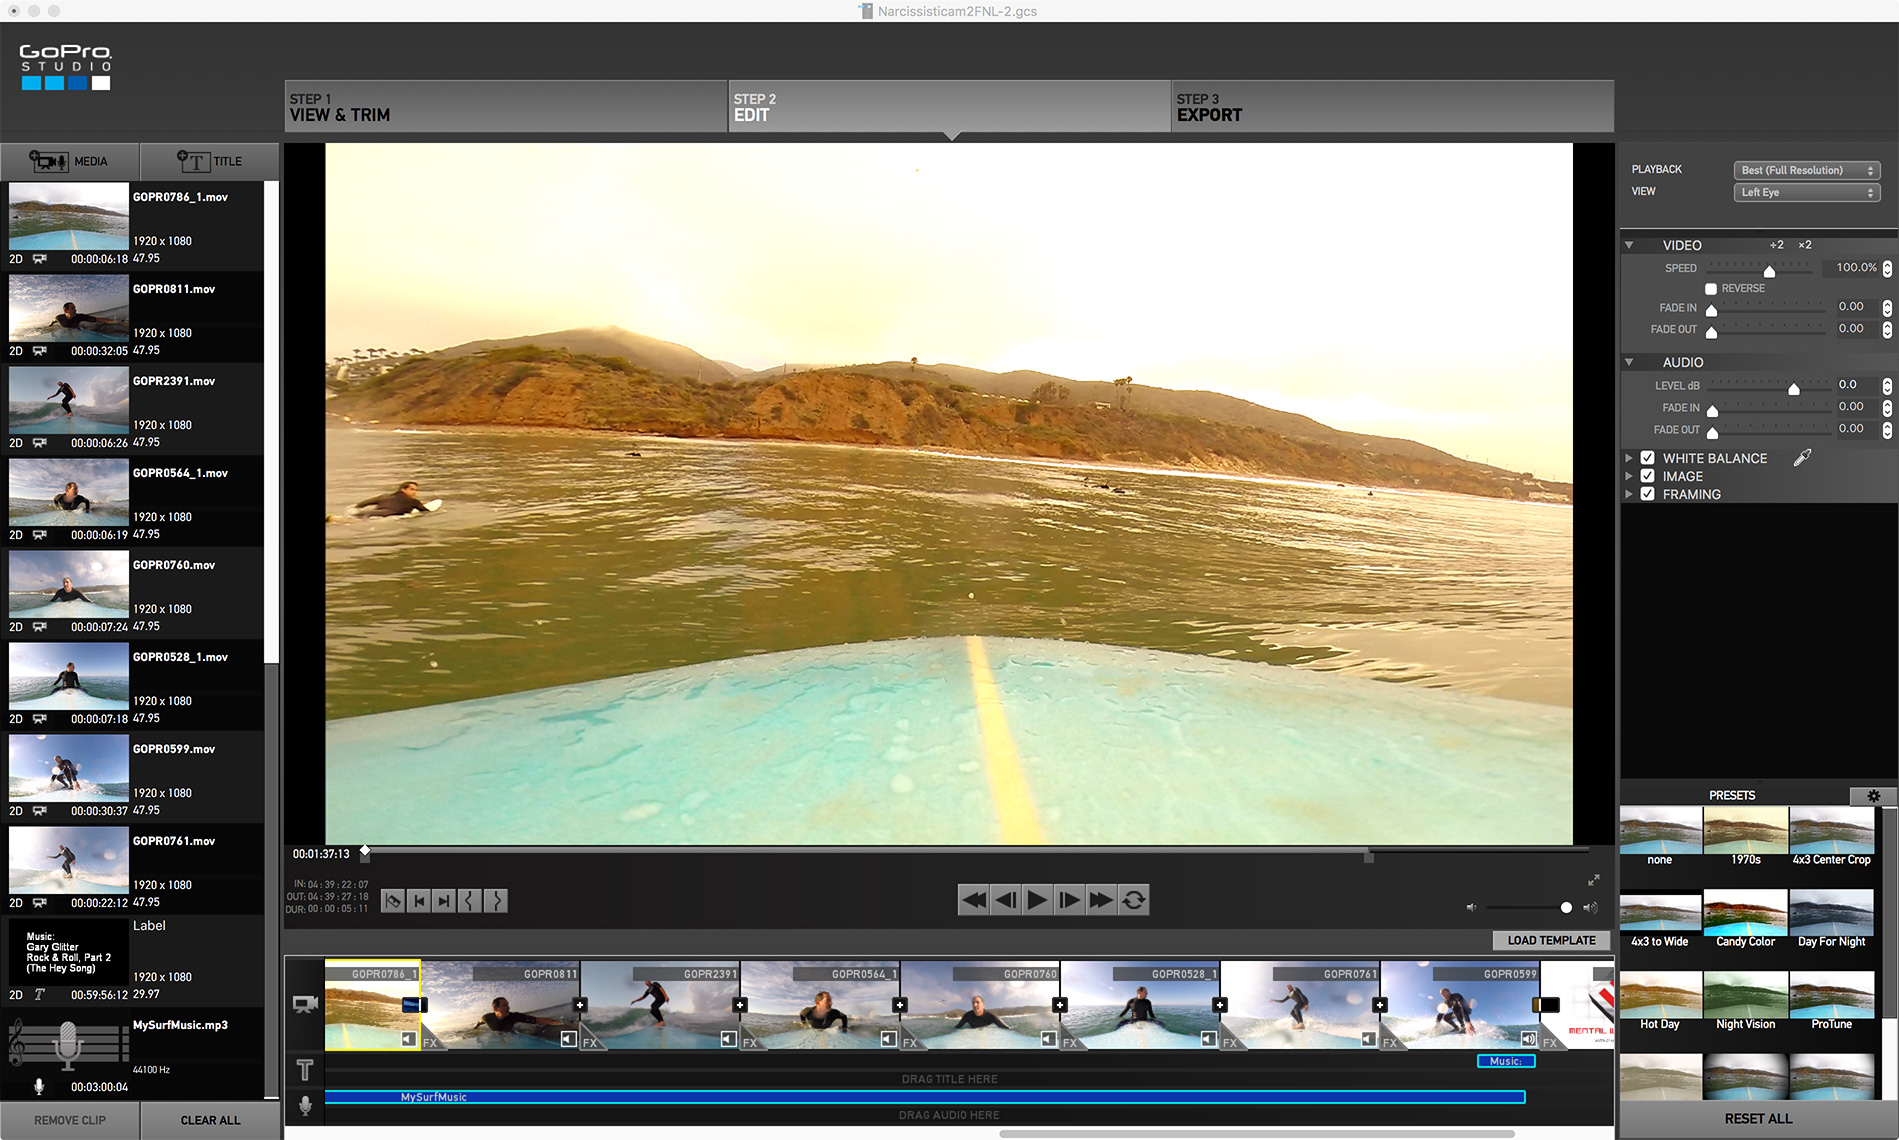
Step 2: EDIT
Each file converted to CineForm in Step 1 is shown in the Media and Title List at left. From this column you can also add music and type title treatments for your GoPro Blank Template. Simply drag an item from the list into the timeline. Video clips will be placed in consecutive order. Use the Trim, Split and Navigation controls to further edit your clips. To edit in time with your music, just move the Playhead to the appropriate place on the timeline and click on the Trim icon.
By clicking the FX icon in the lower left corner of a clip, you’ll have access to 12 Effect Presets. These are located at the bottom of the right-hand panel. The speaker icon at the bottom right of each clip allows audio from the clip to play without cutting out the audio track. Clicking the + sign between clips will apply an adjustable dissolve/fade transition (this can be seen between the first and last two clips in the above image).
On the right-hand column above the Effects Presets are a variety of controls to further adjust your composition globally or frame-by-frame. When happy with your final tweaks it’s on to Step 3.
Click on image to see larger detailed version.
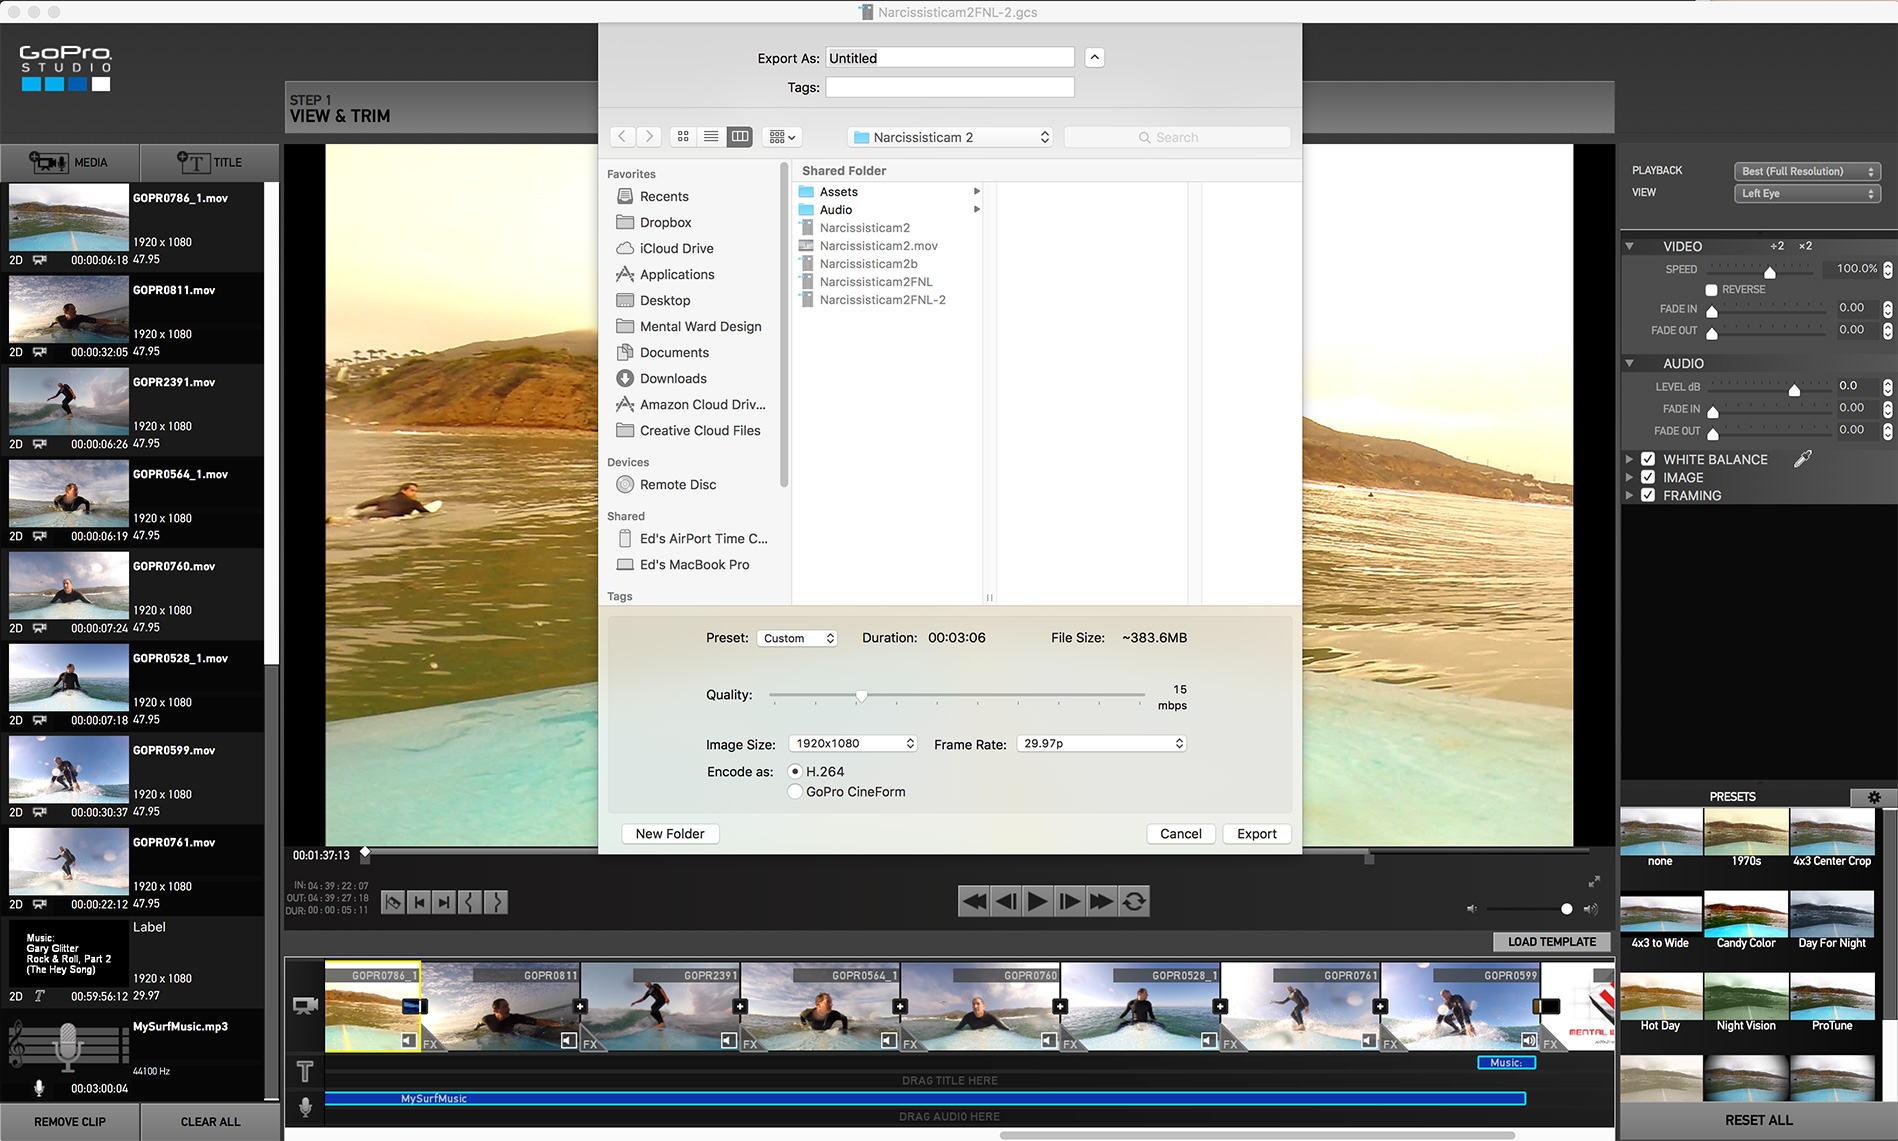
Step 3: EXPORT
Well here goes nuthin’. You’re ready to show the world what you’ve created using a GoPro Blank Template!
Clicking on the Export Button brings up a dialogue box where you’ll title your .mov file and tell it where it’s home is. You’ll also need to choose from a variety of export options. You can choose a preconfigured export setting or create your own custom setting. The preconfigured options include Mobile, HD720p, HD1080p, Archive, Vimeo and YouTube.
Choosing the Custom Preset enables you to set the Quality (1-60), Image Size (640 x 360 – 4K) and Frame Rate (up to 59.94p). You’ll also need to choose whether to Encode as H.264 (most applications) or GoPro CineForm. The only time you’d be likely to choose Cineform would be if you intended to do your final editing in another program such as Adobe Premiere.
Click on image to see larger detailed version.
Conclusions
GoPro Blank Templates are a great way to create professional looking action sports videos without making an investment in purchasing—and then learning—complicated software. The application is easy to use and has a what I find to be a user-friendly interface. After having created my previous video in Photoshop, it was refreshing to have immediate real-time playback as opposed to waiting painstakingly long for Photoshop to load content into RAM during playback. It’s brutal. More on that subject here.
GoPro Studio is powerful for a free program, but even so has its limitations. One problem I ran across was frequent crashes. Luckily it has an auto-save feature that works quite well. In future iterations I’d like to see more than one option for transitions. And the text tool is close to useless. It could certainly use revamping. While it’s very nice to be able to make fairly precise edits to a music track, I couldn’t find a way to swap clips once they’re in place. You can divide a clip and insert another within it, but there seems to be no way to replace a clip without starting from scratch at that point.
Having said that, this is a free program and it does what it says it will do with pleasing results. It falls into the category of “it is what it is.” And you know what? That’s just fine.
PROS
- Free
- Easy to learn
- User-friendy interface
- Edit in-time with audio track
- Fast real-time playback
- IMO more useful than bundled Canon or Nikon software.
CONS
- Crashes often (thank you Autosave!)
- Text tool is nearly useless
- Transitions are limited to Dissolve/Fade
- No ability to replace a clip without starting over at that point
- Unexplained shifting of some clips/elements in final output.
If you are interested in learning the GoPro Studio software further, here’s a link to the manual for MAC OS, and here it is for PC. Happy editing!
Also check out my blog for Narcissisticam I, where I initially tried GoPro Studio and used one of their existing templates.
Video and screen captures ©Ed Ward. Video shot with GoPro Hero3+. Video edited in GoPro Studio.


Recent Comments